
Amy Ballew
Cutter/Draper
Millinery
Kent State University; Fall 2023
Instructor: Grace Cochran Keenan
A mixed graduate and undergraduate course in millinery.
Pillbox Hat
For this first project, I was inspired by the very simplistic but elegant pillbox hats with a matching bow on the back. Following the given instructions I developed the pattern in posterboard first. When covering with fabric, I tried to cover my hat in fleece but when I began to add the side piece it was quickly apparent that fleece was too thick and so I switched to a red woven fabric instead. Another mistake I made was not adding wire support around the brim where it sits on the head. I found this project to be a fantastic introduction to hat-making techniques. It was my first time working with buckram, curved needles, and hat wire.
 |  |  |
|---|---|---|
 |  |  |
 |  |  |
Buckram Crown & Brim Hat
The inspiration for this hat was the small but jaunty hats of the Edwardian period and the 1930s with short crowns and turned brims. This project was a beneficial next step in hat-making techniques. To develop the brim I played in paper quite a bit before finding the right size and shape while using pattern manipulation techniques. After creating the brim I pinned twill tape around the block and pulled buckram to define my cut line for a short crown. One unexpected challenge to this project was how difficult it was to pull fabric evenly over the block since my pins did not want to stay in the wooden block. I created my own bias trim for the crown and brim.
 |  |  |
|---|---|---|
 |  |  |
 |  |  |
 |  |
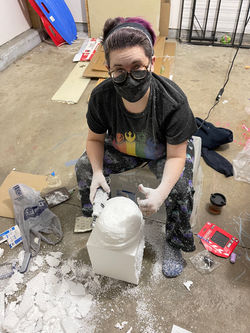
Felt Block Carving
This project was my least successful. I knew going into this project that my subtractive carving skills were limited so I leaned into what I hoped was a simple enough shape to obtain while also being interesting. The material itself was also a challenge to work with since it wasn’t the right kind of carving foam according to the video tutorial we were provided and broke off in small ball bits. In future, if I were to carve like this again, I would take more measurements, be more specific in my planning, and use a different carving material.
 |  |  |
|---|---|---|
 |  |  |
 |
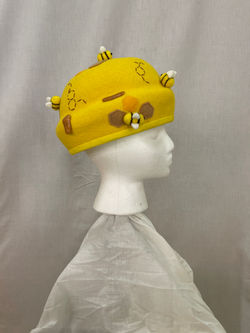
Pulled Felt Hat
Because of the unsuccessful hat block carving, my final concept for this hat was altered. After a comment from a classmate, I decided on a “beehive” theme for this hat. I trimmed this hat with felt hexagon shapes in two colors, small felted bees purchased from Amazon, and broken hexagon embroidery. To create the look of dripping honey I used gold hot glue over a silicone cupcake mold and then sewed them on. The decision to sew on the glue was because I was concerned about the glue not achieving the desired look when applied directly and that it might damage the hat in the process. Unfortunately, due to the carving process the hat was too large for me. I may revisit this hat and add a headband or some other kind of adjustable head support to make the hat sit a little higher and closer to the correct position.
 |  |  |
|---|---|---|
 |  |  |
 |  |
Bonus Pulled Felt Hat
With permission, I used the extra felt hood to experiment with using a 3D printed hat block for pulled felt hat making. This also allowed me to create a hat closer to the original concept I had before my incorrectly sized carving.
I found a free hat block file online and I modified the original file to have a hollow interior for a faster printing time. This took the estimated print time from 3 days to 14 hours. I printed the block in PETG since it required a higher temperature for extruding and thus would have a higher heat tolerance. The block took the steam heat well and did not appear to have any warping after use.
When pulling the felt I shaped in two tucks at the back to give it extra dimension. The floral trim was created from craft felt with embroidery to match the texture of the hat as a whole.
Original File found on thingiverse.com. https://www.thingiverse.com/thing:2022236
 |  |  |
|---|---|---|
 |  |  |
Historical/Period Hat
For either my period hat or my free choice hat I wanted to create a soft, sewn hat since it requires slightly different techniques than I had previously used. The pattern for this hat was taken from a book in my instructor's library and then scaled up to the correct size for my head. To make sure it fit correctly and that my ideas about how to put it together would work I created a mock-up in muslin. The mock-up showed that the size was correct but I would need some kind of support in the brim to keep it up. I decided to use buckram in the brim since it is soft enough to allow the hat to fold, kept the brim light, and was readily available. I used a covered button on the top for a little extra pop of fun with the long ties.
 |  |  |
|---|---|---|
 |  |  |
 |  |  |
 |  |  |
Student Choice -
Top Hat with a 3D-printed block
To challenge myself I chose to create a 3D printed hat block of my own from scratch. I chose a top hat because the hat itself is simple but the block needed is complex and if the modeling failed then I could still create a top hat with techniques used in the pillbox and buckram projects.
What I thought would be a straightforward process was, in fact, quite challenging. I had very limited experience with Fusion 360’s modeling program prior to this project but chose to use it due to its parametric system of modeling. Using a new system was far more challenging than I anticipated, and I had multiple hiccups in the creation of the model. After about two weeks I had a working shape which I tested with a half scale version in PLA. I also made several clearance size tests for how much space to leave between the puzzle pieces.
When going into printing, I used a 0.8 nozzle, 10% infill, and 3 walls to allow the print to go quickly and not lose its strength. It took approximately 3 ½ days of printing and 3 spools of filament. The final brim piece was unfortunately stopped, creating a failed print. That piece also broke the glass print bed which resulted in the purchase of a new 3D printer.
Once the hat block was complete, pulling the hat was relatively simple. I used a black capeline felt blank that was just long enough to pull over the block and brim. Since the 3D block cannot be pinned, I had to tie an elastic around the crown to keep it close to the inner block. I was unable to pull the blank as far up the brim as expected so instead of tying it in, I taped it in place until it dried.
Once dried, I marked the edge of the brim before finishing with hat stiffener. That brim edge was trimmed down and had wire sewn to it for support then I machine stitched black bias binding over it. The bottom of the crown was wrapped in a large ribbon with fake holly berry arrangements.
Download the hat block here: https://www.printables.com/model/676484-top-hat-puzzle-hat-block
 |  |  |
|---|---|---|
 |  |  |
 |  |

